The Build – Part 12
The final step in the Axial Yeti XL build is the assembly of the cage, the body panels and the wheels and tires. Because I wanted something spectacular with the body, I had my white/red/black paint job squirted on it by Larry Genova over at www.kustomrcgraphics.com.
 While building the cage, I came across an issue with the screws assembling the back half. The rear screws, the ones that secure the tire holder to the left and right cage halves, call out AXA37 (25mm) on the upper and lower attachment points. They were too long to fit in the location stated. However, the side bar in the manual shows a picture of the short screws (AXA437) as being 25mm and the longer ones (AXA439) as being 20mm. It’s off, so just keep this in mind when assembling the cage.

I’ve assembled the cage per the pictures in the manual. Again, you’ll have to figure out the screws while you’re building it. Then again, your manual may be correct.

The manual has you installing the tire carrier at a later time, but I did it now while it was off the truck to make it easier.

After getting the body and drivers back from www.kustomrcgraphics.com, I attached the helmets and stickers everything up.

Attach the drivers to the cage. You may have to rotate the rear attachment point to complete the assembly.

I removed the painted body panels from the packaging and installed. Start with the roof, then the hood, then the side panels. I think it looks amazing!

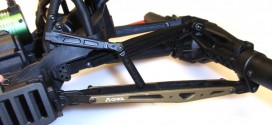
Fit the completed cage to the back of the chassis and secure with the screw-in clips.

Slide the wheels into the tires, making sure the bead properly seated in the wheel. Glue the tires and wheels together using your favorite method. My favorite method is to us the CompetitionX Gloo Toobs.

Remove the twist on tire holder, attach the tire and re-install the holder.

Slide the body clips through the plastic tabs and secure the front of the body to the chassis.

Fit the tires to the hubs and secure with the aluminum hex nuts.
Congratulations on your completed Axial Yeti XL! Take a step back and enjoy the look of this rig; it’s an awesome sight! Charge your packs and get this beast out where it belongs!
Axial Yeti XL Build – Part 1 – Front Differential
Axial Yeti XL Build – Part 2 – Front Gearbox
Axial Yeti XL Build – Part 3 – Rear Differential
Axial Yeti XL Build – Part 4 – Rear Axle
Axial Yeti XL Build – Part 5 – Front Suspension
Axial Yeti XL Build – Part 6 – Steering
Axial Yeti XL Build – Part 7 – Chassis
Axial Yeti XL Build – Part 8 – Electronics
Axial Yeti XL Build – Part 9 – Transmission
Axial Yeti XL Build – Part 10 – Rear Suspension
Axial Yeti XL Build – Part 11 – Shocks
Axial Yeti XL Build – Part 12 – Body, Wheels, Tires